I was chatting in my eBay group recently about efficiency in blogging and other topics regarding computers when a member of our group asked me about tabbed browsing. I told her I'd do a blog on it so others can learn if they so desire. Understand that I've blocked out some things on here for privacy issues. I'm very security conscious and although I have Lifelock, I still do NOT take chances with my privacy. BTW, that is a wonderful feature to have because it's been tested by us—inadvertently—and works wonderfully. I highly recommend it and they're not paying me a cent for saying that.
Anyway, tabbed browsing for those of you who don't know is simple, SIMPLE, simple. You can use 2 browsers if you want also, but tabbed is easier in my book since I'm going from Photobucket to Blogger all the time uploading photos and writing the blog itself. It just saves me time. Also, I had to make these pictures 1000 px wide so you could see them. So it might distort my blog when I post this. But you really need them this large or even larger to see what I'm talking about.
Tabbed browsing allows you to have several windows on your browser at one time. Clicking from one to the other with your mouse is much easier than bringing up each window at different times or using 2 browsers. On a Mac you just use Command + T or in other words, hold the Command key while hitting the "T" key on the keyboard. That opens up a tab for any site you want. You can have as many tabs as you want open at any one time. On a regular PC/Windows machine you would hold the Control key and hit the "T" on the keyboard also.

And, if you are on a Mac and using Safari, this is what you'll see when tab browsing so it's much easier than even Firefox, which is my browser of choice most of the time. Again, I obliterated privacy things with red lines for security. Just go from one site to the other with a click of the icon on the left side of the browser just to the left of the red line I made. It looks like a grid pattern.

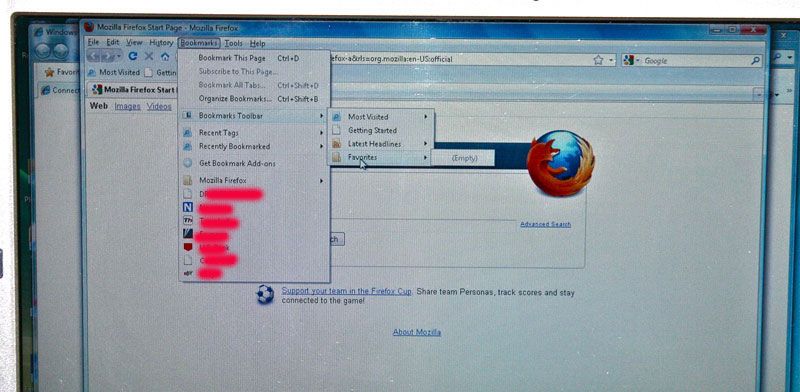
Another thing I'll address is Favorites or Bookmarks. I have a lot of Bookmarks or Favorites and this is just one of my files/folders for bookmarks/favorites. I have one for Bill Paying entitled BillPay for gas, electric, gasoline bills, water and trash, phone, cell phones, etc. Funny that, huh? ;-) You can have a file/folder for your favorite news sites, bloggers, groups, ebay favorites, etc. Much, much easier, chicks. BUT you can also click the little plus sigh (+) next to a tab as you can see in the screenshot below and it will create another tab also. So you have a couple of ways to do it on a Mac. Not sure about Windows PCs.

Now, this is one of hubby's PC/Windows machines. He has two but he uses his Mac 99.9% of the time because we just love the ease and graphics and trouble-free Macs. So this is how you start making a Favorite or whatever file/folder. Open up your Bookmarks and set up a new folder with whatever name you want it to be. I used Favorites here. You can add sites ad infinitum here. However many you want. But you must set up a Folder first.

I then added it to the Toolbar on Firefox as you can see here. (BTW, I took these photographs with my camera. I had both computers here to work on them to show you how to do this.
As you can now see, the Favorites is on his Toolbar for easy access. (See it below just below the Navigation Toolbar, which is the place you type in your URL.) In these days of spending much time on our computers I want the easiest way to navigate the web. I use the keyboard for most of my things. If I can keep my hands on the keyboard and off the mouse, I'll do that most of the time. You just have to memorize the commands for each thing you do. This will become second nature to you after a while.

So now it's there for you to add your favorite sites if you want to. I added mine to hubby's PC as you can see from the drop down menu. Click Done and that's it.

So when he wants to go to my site or any others he might put under his Favorites, it's right on his Toolbar for easy access. I see people all the time going through several steps just to get to a favorite and it doesn't need to be done like that. One quick click and it's done. Also, I apologize for these pictures. It isn't easy taking a regular camera photo of a screen. That's why it's so much nicer to do a screen shot, but I wasn't hooked up to the internet with his computer so couldn't transfer it over here. Hence, I had to do it the old-fashioned way. ;-) Taking a screenshot on a Mac takes about 2 seconds literally and is easy. Taking a screenshot on a Windows PC takes several steps and involves Paint program. If you are truly interested in knowing how, just let me know and I'll do a short tutorial on that.
 ~*~
~*~
So now it's there for you to add your favorite sites if you want to. I added mine to hubby's PC as you can see from the drop down menu. Click Done and that's it.
So when he wants to go to my site or any others he might put under his Favorites, it's right on his Toolbar for easy access. I see people all the time going through several steps just to get to a favorite and it doesn't need to be done like that. One quick click and it's done. Also, I apologize for these pictures. It isn't easy taking a regular camera photo of a screen. That's why it's so much nicer to do a screen shot, but I wasn't hooked up to the internet with his computer so couldn't transfer it over here. Hence, I had to do it the old-fashioned way. ;-) Taking a screenshot on a Mac takes about 2 seconds literally and is easy. Taking a screenshot on a Windows PC takes several steps and involves Paint program. If you are truly interested in knowing how, just let me know and I'll do a short tutorial on that.
~*~


